Propagating Native Plants
Written by: Tallgrass Prairie Center – Cedar Falls, IA : Restoration Guide, 3rd in Series : [http://www.tallgrassprairiecenter.org/sites/default/files/pdfs/Prop_Native_Plant_Brochure.pdf]: [Oct, 2015]
Ready…
Propagating native plants is hands-on learning at it’s best. Gain experience with individual species life- cycle, growth-habits, and natural history… and bring important biodiversity to your out-door living space at the same time!
Basic Equipment Needed
This is a basic list of equipment needed for propagating native plants on a modest scale:
- Native plant materials (seeds and/or plants)
- ZiplocTM bags/permanent marker Refrigerator
- Sterile potting soil Containers/Labels
- Pruning shears, knife
- Trowels and shovel
Starting from Seed
Propagating native plants from seed is a great learning experience, as well as the single most important way to grow a large number of plants from a diverse genetic source. It is the best way to develop seedling identification skills for assessing new restoration plantings. Be sure the seed your planting is viable, either from seed test results or from an experienced collector. It’s important to know a bit about seed dormancy and how to overcome it to successfully germinate native seed.
Seed Dormancy and Germination
Dormancy is an important trait of native species, especially forbs, allowing germination to occur over time and in proper season in nature. For direct seed- ing of prairie species in a planting, sow seeds in late fall so seed will experience a natural winter cycle to break dormancy. If starting seedlings in the green- house, it’s best to break dormancy artificially using various techniques as described below.
Stratification
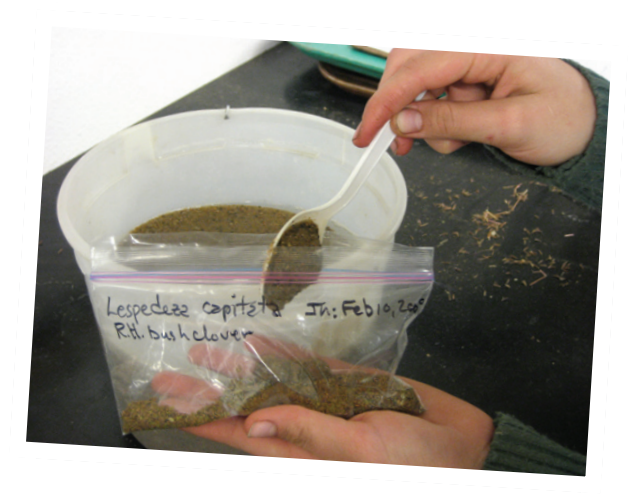
Adding wet sand to an equal amount of seed in preparation for statification.
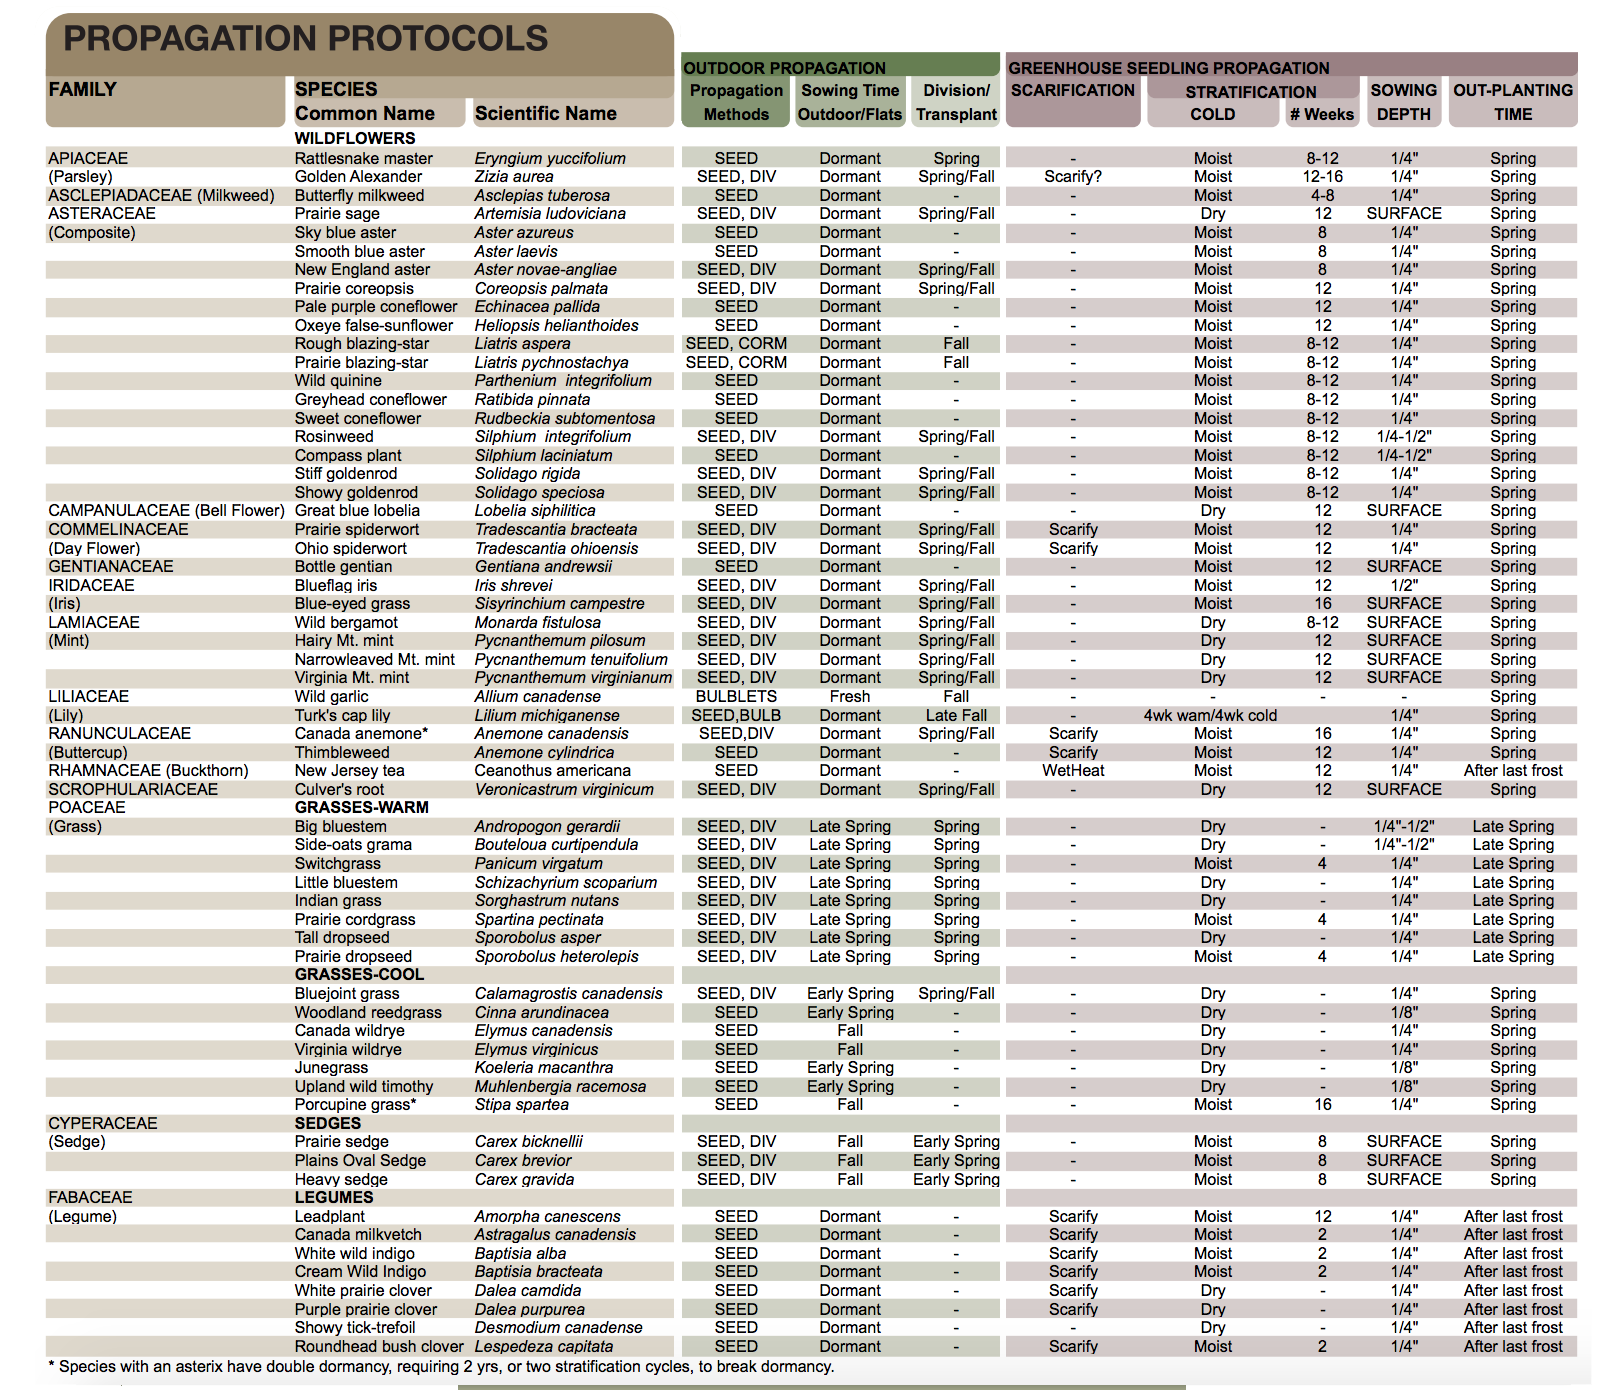
Most prairie species, particularly forbs, have a bio- chemical dormancy requiring a simulated winter treatment, i.e. cold, moist conditions known as strati- fication to break dormancy. Mix seed with an equal amount of moist sterile sand, sawdust, or vermiculite and place in a ZiplocTM bag. Avoid excessive moisture; water should not be pooled anywhere in the bag. Use vermiculite if working with species adapted to drier conditions to minimize the risk of rot. Place seeds in refrigerator (32 to 45 °F or 0 to 10 °C) for the recom- mended period of time (see Table). Check bags weekly for mildew or dryness. A few species, among them American vetch (Vicia americana) and butterfly milkweed (Aesclepias tuberosa), will germinate at these temperatures, so plant immediately if this occurs.
Some species may germinate best when stratified under natural winter temperature fluctuations. If sowing seeds in flats for outdoor stratification, cover with screen mesh to protect seeds from being displaced by animals or heavy rains. Sow seeds in early March in cold frames for stratification and to extend the growing season in early spring. A few species may require warm (68 to 94°F or 20 to 35°C), moist conditions, or warm-moist followed by cold- moist stratification, such as Michigan lily (Lilium michiganense). Other species requiring this treatment are found in the Parsley, Buttercup, Arum, Lily, and Iris families (Baskin and Baskin 1998).
Scarification
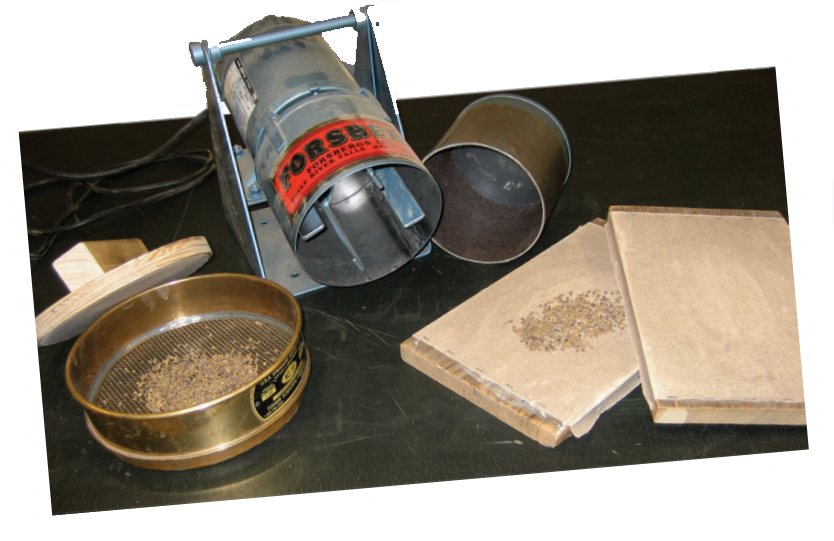
Scarification Equipment
Species with a hard or waxy seed coat require scarification. Scarification is a technique that simulates the natural disintegration (such as weathering, abrasion, or partial digestion) of the seed coat to allow water uptake for timely germination. Species in the Sumac, Legume, Geranium, and Buckthorn families may require scarification (Baskin and Baskin 1998). A simple scarification technique is to rub a single layer of seed between two sandpaper-covered boards for a minute or so until seed coat begins to appear dull. Percussion scarification involves shaking seeds vigorously inside a heavy glass bottle for a few minutes. Commercial scarifiers are also available from seed equipment manufacturers, such as a Forsberg scarifier. In all cases, care is necessary to avoid breaking or damaging seeds.
Get Set…
Seeds are primed and ready to grow! Critical to successful propagation of native seedlings are using suitable containers and potting medium, and proper watering, soil temperature, light, and air.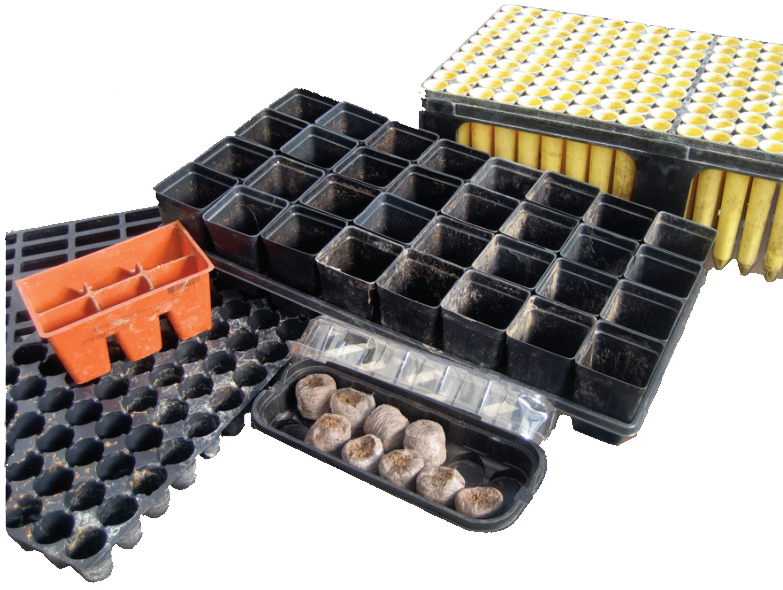
Containers
Containers should provide good drainage, space for strong root development, and yet be small enough to provide efficient use of potting medium and bench space. Deeper containers aren’t necessarily better, but they will help accommodate tap-rooted species. It’s important to allow roots to ‘air-prune’ (can’t grow any further) as they reach the bottom of the soil column so lateral root development will occur within the container. This is accomplished with good drainage around and away from the container (no water puddling under pots). Good lateral root development will aid later in transplanting (and survival!) of seedlings.
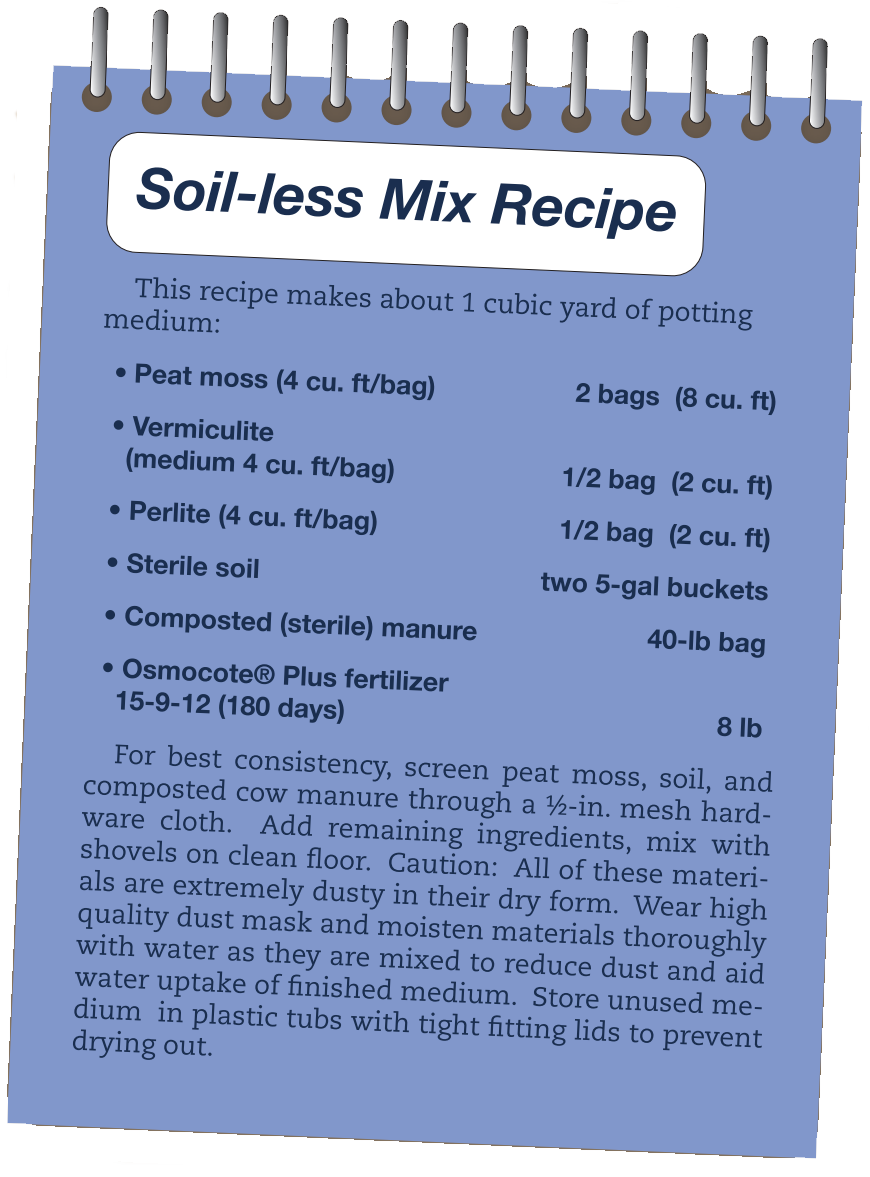
Potting Medium
A good potting medium should be light enough to allow for good root development, provide adequate drainage, and have enough fertility for seedlings to grow quickly for timely transplanting. It should also be sterile, meaning weed seed- and disease- free. A soil-less mix (less than 20% soil) is a good choice, and pre-mixed and packaged sterile potting soil is available commercially. Just be sure it’s well moistened before filling containers and sowing seed.
Sow!
Sow several seeds in each container. Thin later if necessary. Cover with no more than 1⁄4 inch of soil for most species. Caution: Very tiny seeds should not be covered! Species such as Culver’s root (Veronicastrum virginicum), mountain mints (Pycnanthemum spp.), grass-leaved goldenrod (Euthamia graminifolia), Joe- pye weed (Eupatorium spp.), great blue lobelia (Lobelia siphilitica), and prairie sage (Artemisia ludoviciana) do best if sprinkled on top of the soil surface and kept continually moist until the seed leaves (cotyledons) are evident.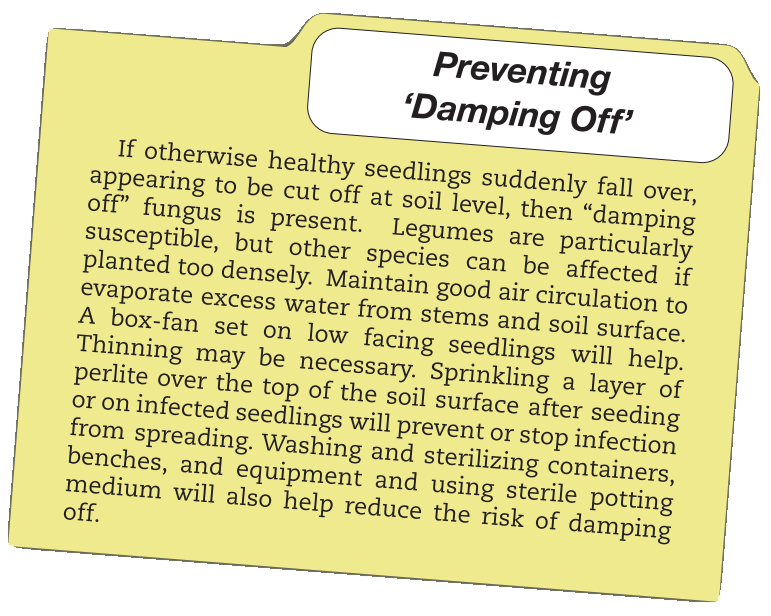
Growing
Prairie seedlings need full sunlight for normal development. Sow seeds in early February in a greenhouse environment (mid-March in cold frames). Keep the soil surface moist until germination has occurred. Use a gentle spray wand so seed isn’t dislodged, forced deeper into the soil, or splattered out of the containers. Expect germination and emergence to occur over a 2-6 week period. Warm season grasses and legumes germinate best in warm soils greater than 70 °F (21 °C ). Cool season grasses and many forbs germinate more readily in cool soil temperatures 40 to 50 °F (5 to 10 °C) and may cease germination at temperatures above 77 °F (25 °C). If sowing seed in flats, precise regulation of soil temperature can be achieved with propagation mats. These are commercially available at reasonable cost from nursery or greenhouse supply companies. Water established seedlings thoroughly at least once a day, moistening the entire soil column. Allow the soil to drain and surface soil to begin to dry somewhat between waterings.
Transplanting Seedlings
Strong root development is the key to successful transplants. Roots should fully occupy the entire soil column forming an intact root “plug” (retains the shape of the container when removed for transplanting). The ideal time for transplanting is in the spring after the last frost- free date for your region. Acclimate seedlings gradually to outdoor conditions of sun and wind through a process called “hardening off.” Set flats or trays outside (sheltered from strong winds and full sun) for a few hours each day from mid-morning to mid-afternoon about a week before transplanting. If transplanting in summer, be prepared to water regularly and deeply until plants are established. Transplanting in the fall (early to mid-September) is an option if strong root development is present to survive the winter months.
Vegetative propagation (Roots, Corms, Bulbs)
Vegetative propagation of native plants (via root/ corm/bulb division) is a fun, fast, and rewarding way to get mature flowering plants for display gardens and landscaping projects. All of the resulting plants will be genetically the same, however, and only a limited number of new plants can be started in this way from each ‘donor’ plant. See Table for recommendations for vegetative propagation of various species.
PLEASE NOTE: Native plants should never be dug from a ‘wild’ source (prairie, woodland, etc.) unless they are being salvaged from a site threatened by destruction. Either grow plants from seed initially, or purchase from a reputable nursery or trade with a gardening friend.
Rough blazing star corms dug in fall for transplant. Large corms can be cut in half.
Roots
Almost any plant with fibrous roots and multiple stems can be propagated by division. Dig up or un-pot plant and use a sharp knife or trowel to cut down into root mass. Some damage will occur, but be sure to include intact root and shoot portions for re-potting/transplanting. Divide in half for two large plants, or multiple times for maximum number of smaller plants. Fall or early spring are the best times for division, depending on the species (see Table).
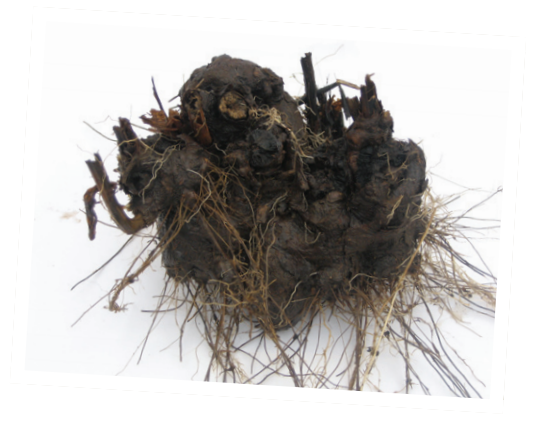
Corms
A corm is a short, fleshy, vertical underground stem. The blazingstars (Liatris spp.) grow from corms. In the fall these can be dug up and divided in a way similar to potatoes, and transplanted for mature flowering plants the next growing season. Small corms (cormels) can be broken off the main corm, or cut larger corms (2 inch diameter or more) in half vertically.
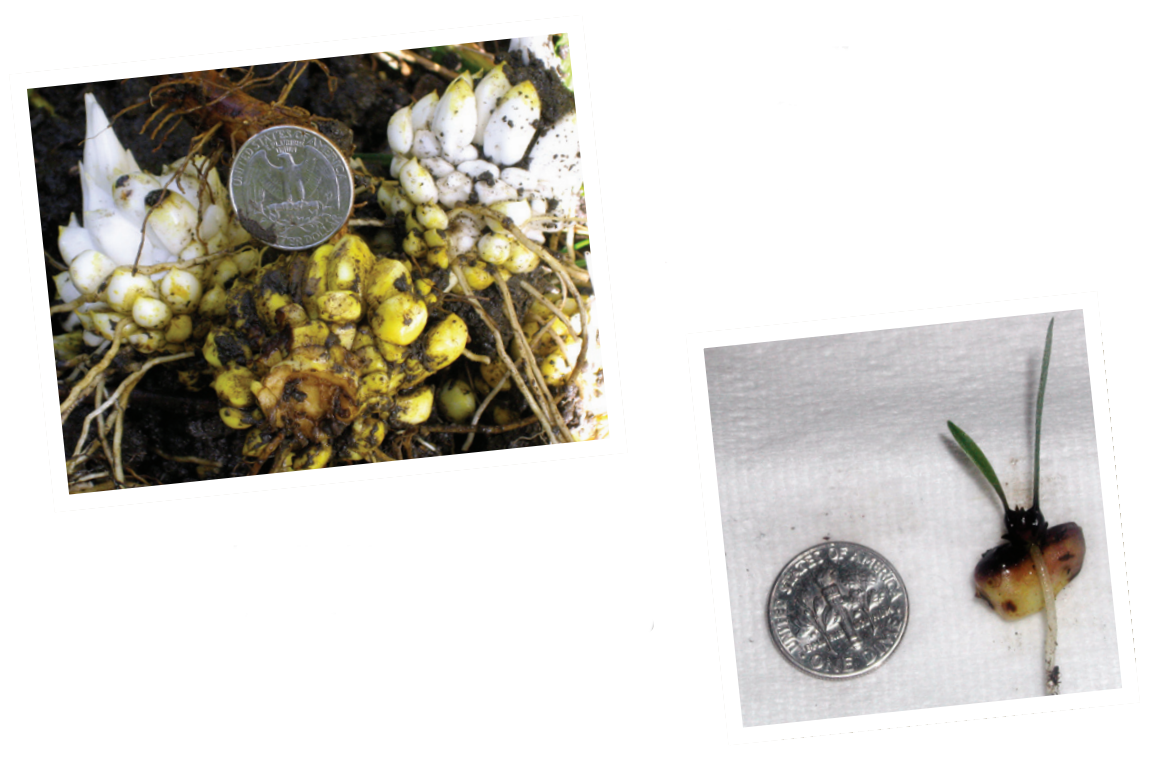
Michigan lily scaly bulbs, dug in fall, all for a single plant. Side bulbs or individual scale can be broken off and transplanted. (pictured on right) Bulb scale growing new leaves and rootlet.
A bulb is a thickened, underground bud with fleshy scales. Species like prairie onion and wild garlic (Allium spp.) and Michigan and Wood lily (Lilium spp.) have bulbs. In vigorous plants smaller side bulbs (bulbels) may develop that can be removed and re-planted. Lilies have scaley bulbs, and each scale can grow into a separate plant. Under good growing conditions, lilies will send out one or two short rhizomes a short distance (2-3”) and a new bulb will form which can be carefully dug up and transplanted for mature flowering plants the next season.
Native Plant Propagation Resources
• Native Plant Prop. Protocol: https://npn.rngr.net/npn/
• Ontario Rock Garden Society:www.onrockgarden.com/
• Prairie Moon Nursery Cultural Guide: www.prairiemoon.com/
• Missouri Botanical Garden, www.mobot.org/gardeninghelp/plantfinder/Alpha.asp.
• Tallgrass Restoration Handbook. 1997. Packard S, and C. Mutel. Island Press. Wash. DC
• Prairie Propagation Handbook. 1972. Rock, H. Milwaukee Boener Botanical Garden.
• Restoring the Tallgrass Prairie: An illust. manual for Iowa and Upper Midwest. 1994. Shirley, S. U. of Iowa Press, Iowa City.
• Smith R, and B. Smith. 1980. The Prairie Garden. 1980.
• Smith,R. and B. Smith, U. of Wisconsin Press. Madison, Wisconsin.
Literature Cited:
Baskin C.C. and J.M. Baskin. 1998. Seeds: Ecology, biogeography, and evolution of dormancy and germination. San Diego (CA): Academic Press, 666.
To request copies, or for more information, contact: Greg Houseal at 319.273.3005 or email greg.houseal@tallgrassprairiecenter.org Tallgrass Prairie Center